Nearly every time I go to a tournament or post up pictures of my Legion beasts, someone asks me how I achieved the ice effect on my bases. Several people on the forums and/or the WMH painting Facebook page have requested a tutorial, so I'm finally getting around to doing one.


Back when I first started my Legion army two years ago I did a lot of research on different techniques for achieving ice effects. My first tests and technique that I use on many of my flat small based models can be seen in one of my previous posts
here. Take a look through that post and you'll see that one of the key ingredients here is Tim Holtz Rock Candy Clear crackle paint.
This stuff is great and can achieve some really interesting results.
Moving on though to how I go about doing some of the large, raised, chunks of ice that you see in some of the opening images of this post.
For most of my bases I use either blue insulation foam or oven bake Sculpy III. You can get the foam at any Lowes or Home Depot and it usually comes in blue, pink, or sometimes green. Sculpy can purchased at any craft store such as Hobby Lobby or Michaels. Foam lends itself to being carved into any shape that you want using just an xacto knife or if you want to get fancy you can use a hot wire cutter but for most applications and xacto works just fine. Sculpy is nice and easy to sculpt and is rigid enough to mostly hold its shape when cut with a knife. This lends itself nicely to making pieces that look like sharp chunks of ice.

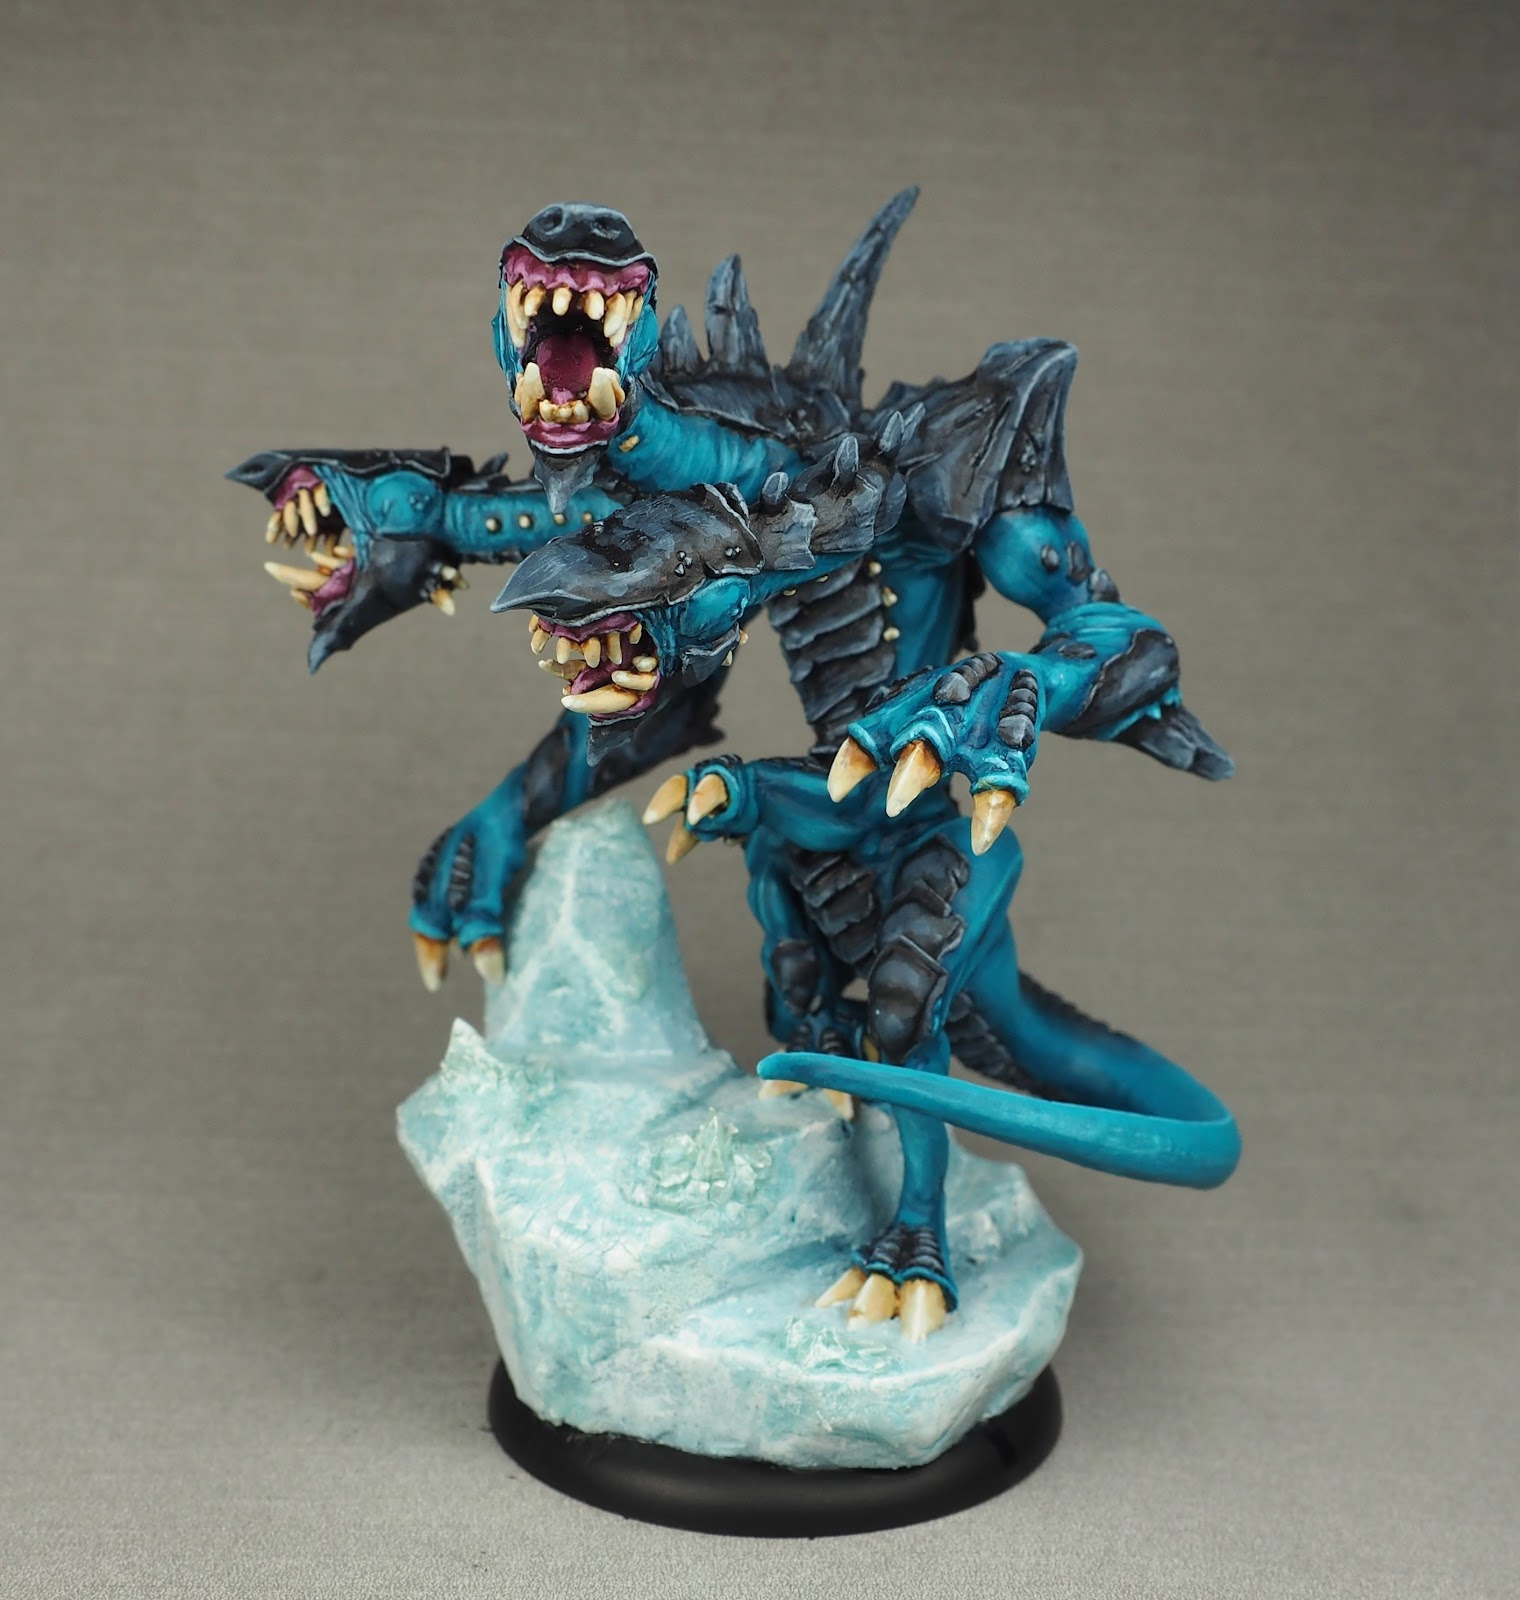
For this tutorial, I'll be showing you the process I used to create the base for my recent Typhon conversion. Most of the time before I get started I'll mock up the different heights that the model's pose requires and then translate that general shape into the final piece. The process for achieving the effect using sculpy is basically the same except of course the baking time to cure the clay.

I typically start with a piece of foam a bit bigger than the base it's intended to go on and then using an xacto knife I just start carving into the foam to bring it to the desired shape as well as into the area of the base being used.
For this particular model there are flat pieces of plastic that the model's feet are attached to. I could cut around them or cover them up with putty once the model is secured to the base, but I've found an easier way without having to go through that fuss.
Once, I think I have the proper heights for the model's stance carved out properly, I place the model onto the foam and trace out the shape of the flat pieces connected to the feet. Then I cut out recesses just deep enough so that the flat pieces sit flush with the top of the foam.
A little more carving and dry and fitting of the model in place and I'm ready to move to the next step.
I didn't manage to get any pictures of this step but I start by gluing the foam to the plastic base using hot glue. Then I pin the model through the feet with pins long enough to extend down through the foam and the base. I drill some holes down through the foam and through the plastic base, and then glue the model's feet onto the foam, again using hot glue.
With the model secured to the base, I fill in the small gaps between the feet and the foam recesses using foam putty. Once I've reached this point I usually stop, go ahead and paint the model, and then come back to finish the base last.
In the meantime I can also create some ice chunks to be used later. This process simply involves pouring about an 1/8" thick layer of crackle paint into an open container and letting it dry. The paint will crack into some nice chunks and shards that can be used on the base later.
With the model painted. I start in on the base. I begin by painting the whole base in a light blue. I use a mix of Citadel Fenrisian Grey, Templeguard Blue, and White. Then I apply a couple layers of drybrushing, working up to a pure white on the hard edges and corners. In the image to the left you can see that I did add an additional piece of foam on the left side of the base. If you want to do something similar or if you removed too much and need to add back, just use hot glue and fill in the seams with foam putty.
After I'm satisfied with the paint, I coat the model several times in high gloss clear coat. Usually about 3 coats.
DO NOT USE AN AEROSOL SPRAY FOR THIS. IT WILL MELT THE FOAM!
After the gloss coats have dried, I use super glue to apply a few ice chunks that I made earlier with the crackle paint. I typically add them sparingly, usually onto sharp edges or peaks of the foam just to accentuate certain areas. This is just a style choice and more could be added if desired.

Now comes the part where I get to apply the crackle paint to the base. Again, I don't go super crazy with the amount of application. I do put it on very heavy in the area where I want it though. Be sure to apply it around the areas where the ice chunks were attached as this helps to blend the chunks and the base together. Other than the areas where the chunks were attached, I usually apply the crackle paint to a few other areas. Once the crackle paint cracks and cures (a few hours usually), I apply a bluish/green wash to the areas where the crackle paint was applied. This helps to bring out the cracks and make them more visible. For the wash I mix up something similar to what I used to initially paint the foam but with

a bit more templeguard blue added and a fair bit of future floor wax and water. You can experiment with some different colors to see what you like. Once the wash is dry, I drybrush the entire base again with white being sure to hit the areas with the crackle paint liberally. This further helps to enhance the look of ice and promote depth between the raised, drybrushed areas and the lower areas that received the wash.
Finally, I gloss coat the entire base one last time to bring back the shine that was lost during washing and drybrushing.
And here we are with the final product. I hope you've found this tutorial helpful and you can use some of these techniques in your own projects!